From Pixels to Insights: Creating a High-Quality CV Dataset from Video
"Garbage in, garbage out”. It’s a common phrase in the Machine Learning (ML) & Computer Vision (CV) space because the quality of your dataset can make or break your project. Whether you're developing an object detection system or any other ML-based CV application, it all starts with a high-quality dataset. In this post, we'll walk you through the process of collecting, preparing and annotating video data, while highlighting how to avoid common pitfalls. We’ll touch on a few topics:
First off, why is this important?
We train an ML model using examples of what we want the model to eventually detect. Imagine only having example images of a specific model of a sedan. If a truck shows up in the data we want the model to process, what is it going to do? What should it do? Think of this as “teaching” the model which has no intuition. Teaching (i.e. training) the model with many different examples of what we eventually want to detect will lead to substantially better detection rates.
Defining Your Use Case – Get Specific!
Before diving into data collection, it's crucial to clearly define your use case. Let’s assume we're building a system to detect and classify different types of road assets (signs, traffic signals, cones, etc.) in urban environments. This specific goal will guide our entire data collection and preparation process.
In this case, consider the different positions, locations, and environments of your input source video. Ask the following questions:
- Is the camera stationary or is it moving?
- Will the camera always be at the same height and angle, or will it vary?
- Will each video come from the same type of camera (frame resolution, FPS, etc)?
- What are the expected environmental conditions (rain, snow, fog, sun, nighttime, etc.)?
- What are the general sizes of the objects that need to be detected?
- How fast do detections need to occur (real-time, within 10s, days)?
Pitfall to Avoid: Having a use case that isn’t clearly defined may lead to a model not performing well under certain scenarios. Take the time to determine as many of the real-world scenarios that the model will eventually see. This will lead to a more robust, “generalized” model.
For this use case, let’s assume the following:
- The camera is moving – attached to a vehicle which is driving around at lower speeds (< 40mph).
- The camera is attached to different vehicles at differing heights and angles, all oriented forward towards the horizon.
- The camera model and settings remain consistent.
- The camera is exposed to many environmental conditions except for driving at nighttime.
- Need to be able to detect objects within 30ft.
- Inference will occur using a “real-time” device (e.g. OAK-D or NVIDIA Jetson)
The Data Collection Phase
Gather Diverse Data
Continuing with the example of vehicles in urban environments, it's ideal to collect video from sources representative of what will be ran through inference (the time when the model is used to detect objects in a production setting). For example:
- Street-level video of many different urban environments
- Having the camera oriented at different heights and angles
- Various weather conditions (rain, snow, sun, fog, etc.).
- Various daylight conditions (morning, afternoon, evening)
- Subject to different camera conditions (lens flare, ghosting, blurring, etc.)

Additionally, look for well-vetted public datasets that align with your use-case. If the public dataset aligns with the kinds of objects you are aiming to detect in same conditions, consider using this as an additional source of data. However, always ensure that the related license of the dataset also aligns with how you plan to use it. Here are some common license types for reference.
Pitfall to Avoid: Lack of diversity in images used for training. Ensure your dataset includes road assets in different lighting conditions, weather, and from various angles. This helps the model better generalize to more environmental and situational conditions.
Dataset Prep
1. Standardize Image Format and Size
Convert all images to a consistent format (e.g., JPEG) and resize them to a standard dimension that works for your training a model to suit your use case. Not only can this streamline management of your datasets, but it also can potentially speed up your training. If the objects being detected are quite large and easily visible within the image, you may be able to achieve high performance with relatively low-resolution images (i.e. 512px or potentially smaller). However, if the target objects are relatively small in an image even at a high resolution, you may need to use higher resolution images during training (i.e. 1024px). For reference, many models set their default training `imgsz` to 640px. Check out this blog post for example scaling commands using the popular FFMPEG tool.
Pitfall to Avoid: Overlooking image quality and not considering the size of the objects being detected when training. Ensure that there is enough visual information for the model to accurately learn what an object looks like. Additionally, if you decide to resize your video, ensure that resizing doesn't significantly degrade the image quality, as this can affect model performance. Note that different scaling algorithms may perform better or worse for different scaling tasks.
2. Background Images
It may be counterintuitive but having images that do not contain any of the objects that need to be detected is beneficial. This typically improves model performance by reducing false positives and false negatives. Popular datasets typically have a portion of their images dedicated to background images. COCO, for instance has 1% (~1000 images) dedicated for background images. Having 1-10% of a dataset dedicated to background images is generally recommended.
For our example use case, some good background images to include would be of a road with none of the target objects in the frame.
Pitfall to Avoid: Not including background images in a dataset. This is one piece of the puzzle though if you are noticing high false positive or false negative rates. See the following section for more info. Check out the guidelines from Ultralytics for more info.
Data Annotation
1. Choose the Right Annotation Type
In CV, an annotation is the process of labeling images or video frames with specific information, such as object boundaries, classifications, or other attributes, to train and evaluate machine learning models.
Consider our use case, we are required to just detect the road assets in real-time on an embedded edge device. To meet the real-time detection requirement, bounding boxes are preferred. Segmentation, another annotation type, is less desirable in this case since it takes more processing time during inference.
For your use-case, the circumstances may require an entirely different type of annotation (Oriented Bounding Box, Pose, Classification, etc.). Each annotation type provides unique benefits and disadvantages. So, consider what your use-case requires and select the best option that fits your criteria.
Pitfall to Avoid: Choosing the incorrect annotation type. Consider the performance requirements of your model. Is speed the highest priority over annotation fidelity? Additionally, think about current and future use cases of the dataset that you are creating. How does your selected annotation type affect maintainability or training of different models in the future?
2. Develop Clear Annotation Guidelines
Whether you are working with a third-party service or an in-house team to annotate your videos, having clear guidelines on how annotations should take place will save time and stress in the long run. Before you start annotating, build these guidelines with the team to ensure everyone is on the same page. Answer as many of the outstanding questions upfront to streamline the annotation cycle. In general, clarity around the following items is beneficial:
- Where and how the data to annotate should be accessed?
- Written definition of the specific classes.
- What is the object and what are its characteristics?
- Rules for drawing the specific annotation type with examples.
- Rules for annotation priority.
- If there is an existing class imbalance, should priority be given towards finding instances of a class to even out the dataset?
- Quality control
- At the end of an annotation cycle, should a spot check be performed to ensure annotation quality?
- Dataset generation
- Once annotations are complete, where should the dataset live?
Pitfall to Avoid: Ambiguous guidelines lead to inconsistent annotations. This can lead to a confused model and a frustrated team. Ensure that the guidelines are clear within the team and that updates are made as clarity is built.
3. Use Reliable Annotation Tools
Invest in good annotation software or services. Tools like CVAT, Label Studio (formerly LabelImg), or RectLabel can significantly speed up the process. Some annotation tools integrate powerful features to speed up complex annotation tasks (check out Segment Anything Model 2). We recommend CVAT due to its large community and incredibly customizable tooling.
Find what works best for you. Try a few different tools to see where they excel or fall short.
Pitfall to Avoid: Investing in the wrong annotation tool. You are going to be spending a lot of time using the tool. Spend the time testing a few different tools to ensure you make the right choice for your needs.
4. Handle Class Imbalance
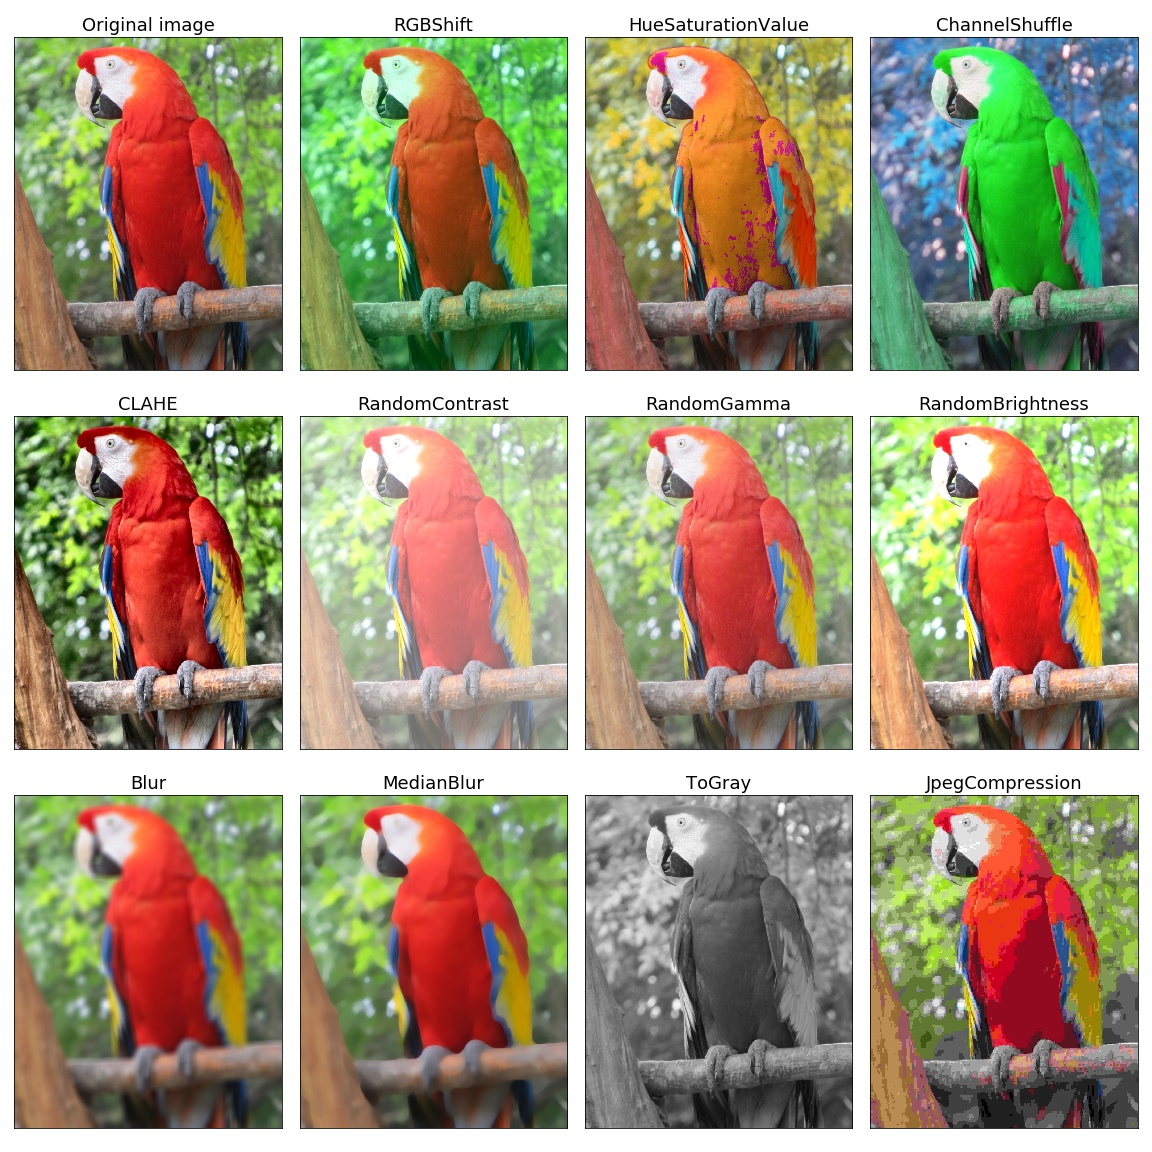
In real-world scenarios, you might end up with more images of one class over another (e.g. more stop signs than mile markers). Consider addressing this imbalance through techniques like data augmentation, oversampling, or synthetic data generation. Data augmentation is an excellent starting point to increase the number of instances of a specific class when needed. Libraries like Albumentations are easy to leverage to do a lot of the augmentation heavy lifting.
Synthetic data generation is a newer player for creating artificial training data. Combinations of Generative AI Imagery or game engines like Unity or Unreal Engine are gaining traction to build datasets for use in computer vision where actual data is difficult to come by. This is certainly a much more involved option, but is a powerful tool given the right use case.
Pitfall to Avoid: Ignoring class imbalance which can lead to biased model predictions. If you are noticing weak performance with certain classes compared to others, it may be a symptom of class imbalance. Perfect balance may be hard to attain but strive to have equal representation from all the target classes.
Final Touches
1. Split Your Dataset
Divide your annotated dataset into training, validation, and test sets. A common split is 70% for training, 15% for validation, and 15% for testing.
2. Document Your Process
Keep detailed records of your data sources, cleaning steps, and annotation process. This documentation is crucial for reproducibility and potential future improvements.
Pitfall to Avoid: Poor documentation can make it difficult to troubleshoot issues or expand your dataset in the future.
Conclusion
Creating a high-quality CV dataset is a meticulous process that requires careful planning and execution. By defining your use case clearly, collecting diverse data, prepping it thoroughly, and annotating it accurately, you set a strong foundation for your Computer Vision project. Remember, the effort you put into creating a robust dataset will pay off in the form of more accurate and reliable model performance.
Who we are
First off, thanks for reading! We hope this provides deeper insights on how to build successful Computer Vision projects. Whether you’re tackling complex challenges or looking to optimize existing processes, our team specializes in creating customized, efficient, and scalable Computer Vision solutions that seamlessly integrate with your infrastructure. Interested in collaborating? Let’s connect to discuss how Sandau can support you with tailored, end-to-end Computer Vision pipelines. Reach out to us at hello@sandau.dev.
